Rabbit ELISA Kits
Rabbit IgG (Immunoglobulin G) ELISA Kit (RBFI00157)
- SKU:
- RBFI00157
- Product Type:
- ELISA Kit
- Size:
- 96 Assays
- Sensitivity:
- 0.938ng/ml
- Range:
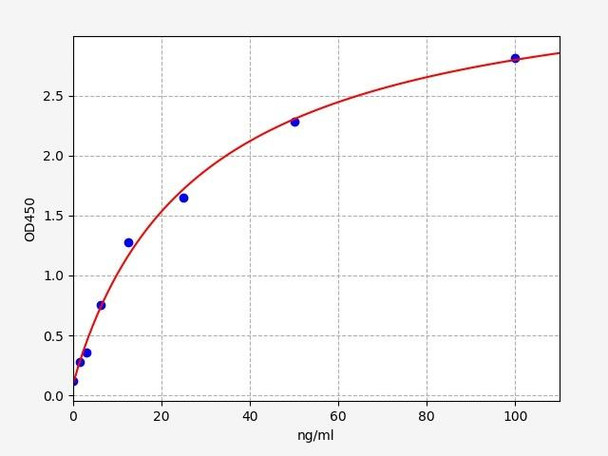
- 1.563-100ng/ml
- ELISA Type:
- Sandwich
- Synonyms:
- IgG, Immunoglobulin G
- Reactivity:
- Rabbit
Description
Rabbit IgG (Immunoglobulin G) ELISA Kit
IgG, or immunoglobulin G, is an antibody found in the blood and bodily fluids. It plays a critical role in the immune system's defense against pathogens. These Rabbit IgG ELISA Kits are specifically designed for research purposes to detect and quantify rabbit IgG antibodies and alloe. Researchers to study the immune response in rabbits, assess antibody levels during vaccine development, monitor diseases or infections, and evaluate the effectiveness of experimental treatments or interventions in rabbit models.
Key Features
| Save Time | Pre-coated 96 well plate | |
| Quick Start | Kit includes all necessary reagents | |
| Publication Ready | Reproducible and reliable results |
Overview
| Product Name: | Rabbit IgG (Immunoglobulin G) ELISA Kit |
| Product Code: | RBFI00157 |
| Size: | 96 Assays |
| Alias: | IgG ELISA Kit, Immunoglobulin G ELISA Kit |
| Detection Method: | Sandwich ELISA, Double Antibody |
| Reactivity: | Rabbit |
| Sensitivity: | < 0.938ng/ml |
| Range: | 1.563-100ng/ml |
| Storage: | 4°C for 6 months |
| Note: | For Research Use Only |
Additional Information
| Recovery | Matrices listed below were spiked with certain level of Rabbit IgG (Immunoglobulin G) and the recovery rates were calculated by comparing the measured value to the expected amount of Rabbit IgG (Immunoglobulin G) in samples. Please contact us for more information. |
| Linearity: | The linearity of the kit was assayed by testing samples spiked with appropriate concentration of Rabbit IgG (Immunoglobulin G) and their serial dilutions. The results were demonstrated by the percentage of calculated concentration to the expected. Please contact us for more information. |
| CV(%) | Intra Assay <8 Inter Assay <10 |
Kit Components
| Component | Quantity | Storage |
| ELISA Microplate (Dismountable) | 8x12 strips | 2-8°C/-20°C |
| Lyophilized Standard | 2 | 2-8°C/-20°C |
| Sample/Standard Dlution Buffer | 20ml | 2-8°C |
| Biotin-labeled Antibody (Concentrated) | 120ul | 2-8°C (Protection from light) |
| Antibody Dilution Buffer | 10ml | 2-8°C |
| HRP-Streptavidin Conjugate (SABC) | 120ul | 2-8°C (Protect from light) |
| SABC Dilution Buffer | 10ml | 2-8°C |
| TMB Substrate | 10ml | 2-8°C (Protection from light) |
| Stop Solution | 10ml | 2-8°C |
| Wash Buffer (25X) | 30ml | 2-8°C |
| Plate Sealer | 5 | - |
Other materials required:
- Microplate reader with 450 nm wavelength filter
- Multichannel Pipette, Pipette, microcentrifuge tubes and disposable pipette tips
- Incubator
- Deionized or distilled water
- Absorbent paper
- Buffer resevoir
Protocol
*Note: Protocols are specific to each batch/lot. For the exact instructions please follow the protocol included in your kit.
Before adding to wells, equilibrate the SABC working solution and TMB substrate for at least 30 min at 37°C. When diluting samples and reagents, they must be mixed completely and evenly. It is recommended to plot a standard curve for each test.
| Step | Procedure |
| 1. | Set standard, test sample and control (zero) wells on the pre-coated plate respectively, and then, record their positions. It is recommended to measure each standard and sample in duplicate. Wash plate 2 times before adding standard, sample and control (zero) wells! |
| 2. | Aliquot 0.1ml standard solutions into the standard wells. |
| 3. | Add 0.1 ml of Sample / Standard dilution buffer into the control (zero) well. |
| 4. | Add 0.1 ml of properly diluted sample ( Human serum, plasma, tissue homogenates and other biological fluids.) into test sample wells. |
| 5. | Seal the plate with a cover and incubate at 37 °C for 90 min. |
| 6. | Remove the cover and discard the plate content, clap the plate on the absorbent filter papers or other absorbent material. Do NOT let the wells completely dry at any time. Wash plate X2. |
| 7. | Add 0.1 ml of Biotin- detection antibody working solution into the above wells (standard, test sample & zero wells). Add the solution at the bottom of each well without touching the side wall. |
| 8. | |


